Using regular paper or C/S if you prefer...
Step 1:
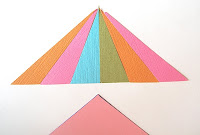
Make 2 triangles based on the size of circle punch you will use as the flaps (see later pics). I used the 1" punch... this makes my triangle base 6 inches... for 6 color panels (write your number & letter code (color on your panel) (O=orange, P=pink, B=blue..etc) on each panel (triangle section). This makes it easier when putting the puzzle back together. You then want to decide how tall your peak will be.. mine is 2.5". I then drew a line down the middle of the triangle and one inch apart from their to the left and right to the center top of the triangle. On one triangle only... cut out your panels.. you want to be pretty accurate and straight, so when you glue them all together... they all line up nicely.
NOTE: The second spare triangle will be a copy of the first and is where you're going to paste all your panels to later. Set the second one aside and don't cut out the panels.
I tried to take my panel to the corners of scraps.. this keeps my panel sides straight and it goes real fast this way...
This is what you'll end up with.. never mind if your top tip isn't the full length of the triangle... You can see in the second pic...
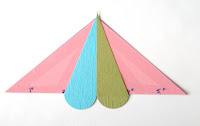
Next, you will punch out circles in the dimension you chose, mine are 1 inch. I chose matching colors.
I adhered them to the back of their matching panel and trimmed off the excess that will show on a side.
Untrimmed
 Trimmed
This is how they should look as you line them up.. I only press on the circles gently in case I need to reposition the circles and adjust. Remember, align the the bottoms and sides...
Later, you can embellish the tip in order to hide any unmatched tips...
NOTE: I HAVEN'T PASTED MY UMBRELLA TO ANYTHING YET!!
Now, the final assembly:
First, you will now use that second triangle... seen here at the bottom and this will be where you paste the panels to. Note: Do not put any adhesive on yet (as I show in the pic)... go to next step.
Second: You will want to trim from the bottom about an 1/8". You want to do this so when you paste the panels down, there is no pink showing at all... see pic ... now you can add some adhesive and remark your 1" dots on the bottom so you know where to past your panels...
Third: Paste starting with the center panel, left or right, no difference... notice that I went over the bottom edge a little and the top as well... as long as you are centered.. you should end up straight.
Make sure to match up the bottom edge of your umbrella panels.. . you know, where the circle meets the panel so you get a straight line across... like this:
And finally, like this.....
Lastly... I made a pole just with a strip of Cardstock and adhered to the back... now you get a view from the back... notice how the pink is shorter on all sides of the umbrella... a plus is that it raises the whole umbrella so it has the effect that it's off the paper... add some dimensionals if you like for added depth.
Now, you can go to town and embellish as you like... see what I did?
I hope you found this tutorial easy to follow... please post a comment and let me know. Thanks for looking and have fun with this!
Sandra.
A close up


