October 26, 2011

Here comes Santa Claus

In case you thought you've seen it all with the Big Shot...guess again... Lorri Heiling has come up with a Top Note Die Santa Sleigh that is just too cute!!!  Best part of all, is that you can fill it with gifts and decorate as you wish.... In my version, I also embossed it, sponged it, added some jingles and a stick horse, candy cane in a stocking and lots of bows.  I LOVE IT!!! 

Hope you like it... it's going on a scrap page.

 Here is the basic breakdown of this wonderful creation... In case you don't own a Big Shot, you can get one for free until October 31st if you join the Stampin'Up! family!!  Ask me how... hurry!

  
Top Note die and for the bottom I used the Swirls Scribbles Sizzlet Die.. that's it!

September 22, 2011

Get Ready to Count Down!!!!

Yes, you read correctly... not too many shopping days left for Christmas, but more importantly is the time to celebrate the festivities and Season of Giving with a special Advent Calendar....

This Class will be held on November 4th 7:00 pm  - 10:00 pm at my house!!


If you came to my Open House in September... you saw the beautiful creation first hand, but in case you didn't... here are some views....


If you like what you see... come on over to my Events calendar and sign up now!!
Sandra

September 20, 2011

Holiday Topiary Class... come join!!

Holiday Topiary Class
October 7th, 7-10 pm
1767 Clayton Way
Concord, CA 94519
925-685-2103
Enrolling Now!!


Join us for this class that you will want to repeat for other occasions as well.  We will be creating a holiday topiary that can be used as a center piece for a Holiday table, Mantle or anywhere you wish to show it off.
This is a One of Kind Holiday Treasure you’ll want to bring out Year after Year!!!

Closer views...

-----------------------------------------------------------
How do I Sign Up?
It’s easy
!
Call: 925-413-3367 or text me to sign up… There is NO CHARGE FOR THE CLASS. 

Due to space limitations, the class limit are 8… be sure to call me right away.

***This class is for adults only due to the tools being used during class... infants are welcome as long as they are not walking.  Children over the age of 13 are welcome if they wish to participate as an enrollee.


Description: You will be using the Designers Series Papers from Holiday Mini Catalog.  They are the Holly Berry Bouquet Papers and new little Jingle bells that are dangling from the bottom of the Green piece… absolutely gorgeous!!! All embellishments are included in the kit… these are: the Red Satin Ribbon, the green taffeta ribbon, the red striped ribbon and crumb cake ribbon….in addition:  the bakers twine, jingle bells, pins and felt.  Oh and the adhesive’s and Silver glimmer paper as well.

As was the holiday frame class… this one is sure to delight and will fill fast.


***What you will need to Purchase PRIOR to the day of the class***

You will need to purchase by Sept 30th… if you want the order to be shipped and make it to you on time (Call me with a CC if you wish me to order for you) these items will be heavily used so you need to have your own.  You will end up with leftover papers, buttons and gorgeous red glimmer papers that you can use for anything you like.  Even make another one at home!!!

1.     From the idea book and catalog: 

·        119880     5 petal punch 16.95
·        119858     Boho Blossoms punch  16.95
·        124004     Holly Berry Bouquet Designer Series Papers  12.95
·        121790     Red Glimmer Paper (includes 2 sheets)  4.95
·        119787     Brights designer buttons pack 8.95
Plus shipping and tax

2.     From any craft store:
·        2 size Styrofoam balls: One about 3.5” and one 2.5”. No bigger!!!
·        One dowel. About 18” long… if longer, no worries, we can cut… and about .25” in diameter.
·        A can (could be formula or nuts can) with plastic lid… washed and clean. About 5” tall (can be 4.5 or 4”) by 4” in diameter.

I will provide the fill to weigh the can down.

*********************************************************************************

BONUS!!!!

If I have a full house, as in the last class… I will be raffling a complete stamp set!!!

I HOPE TO SEE YOU HERE

Thanks again for your interest and continued friendship.
Sandra Hanedanian
Stampin’Up! Independent Demonstrator

September 09, 2011

Here comes Halloween, Here comes Halloween!!

OMG!! I can't believe how long it's been that I've posted here... whew!!!  Been very busy with my surgery, kids summer, vacation and now back to school... FINALLY!!! I'm playing again and have had an Open House that was a lot of fun.

I've come up with some classes for the Holiday Season and my Kickoff is a Perpetual Frame (as I call it).  Perpetual because you can interchange the insert as often as you like... match your favorite Holiday, Occasion or whatever you like!!!  Make it a unique Living Masterpiece of your own...

So, here is my Holiday Perpetual Frame Art project.... For Class enrollment and information, please visit: www.creativeplaytime.stampinup.net .  Space is limited and fills fast... don't miss out... it's only $20.00.

And, bonus Sneak Peek of my Halloween Perpetual Frame class.l.  Happy Fall Y'all!!

Sandra

Full Frame view... all items are layered and some 3 dimensional...

My cute Hanging Bats... 


 Sparkling Spooky Candle holders...


Another view... 

My beautiful Thanksgiving Frame... 

The frame has little envelopes that have special Thanksgiving sentiments in them... 
Hope you don't miss out!!

Sandra.

June 08, 2011

New Catalogs!!!

I love this time of year when Stampin'Up! retires the old and in comes the new!!!  And, yes this year they actually shipped the catalogs to us early!!! Wanna see... viola!!!  UPS dropped all this off today... and yes, it's all mine!!!

Sorry... that's all I can show for now... can't give you a preview of the actual books.... but,  you know I have them now!!! 
It was kinda funny cause I left to drop off Alina at daycare when I saw the UPS guy wave at me as I pulled out of the driveway... so I went down the street a bit and saw he pulled up to my house (he never drops off this early!! EVER!!!), so I flipped around and came back.. as he's unloading all the boxes he sees my garage open... and he burst into laughter... guess he didn't expect me to turn around... well, you got that right!! Too precious to leave all that sitting on my porch!!! He waved goodbye and I closed the garage door.... quickly returning to open the goodies!!! Woo Hoo... playing now!  Bye.

June 07, 2011

CC's Card

 It's that time of year again and of course I'm gonna make the card!!!  No brainer there... and what better to use than our new SU stamps that are going to be released next month!!  Woo Hoo!!!  So for those of you who cannot see the new papers, colors and product yet... Here is a preview.... Tah Dah!!  I semi cased a sample in the new book!!  I love how cheerful this came out.... isn't that how birthdays are supposed to be?  Thanks for looking!


Front view and below with Envelope... gotta decorate that too of course....


All Products are Stampin'Up! unless otherwise stated
Recipe: 
Stamps: From New IBC (coming in July 2011) *Pennant Parade, from Current IBC: Create a Cupcake and Word Play
Inks: All Classic: Daffodil Delight, *Lucky Limeade, Pumpkin Pie and Tempting Turqouise
Cardstock: Whisper White, Daffodil Delight, and *Lucky Limeade.
Other: 
Designer papers: Patterns pack in pumpkin pie and tempting turqouise design
*Petits Pennant Punch, 1 3/4" rouind and 2 3/8 scallop round punches.  Scallop border punch.
Itty bitty buttons, dimensionals, glue dots, paper piercing tool.

You can order everything with the exception of items with * infront (releasing next month) 24/7 here.

May 29, 2011

Our Princesses

I had a vision and went with it and Viola!!! My mermaid came to life within a few moments of playing around with my punches... soon , I had an elaborate body attached to a torso and head... then the HAIR!!!! Lovin the hair.... flowing Red like Ariel's locks... even got her big bangs!!!   Soon it all came together and then to add details I embossed her tail strategically and pearlized it as well as bedazzled it... her seashell top super sparkly and a dainty little pearl necklace. So, here is my lovely Ariel... she'll be adorning my Baby Girls scrappage from Disney.

I will post all the details very soon... I promise.  Thanks for looking.


And then, there was Cinderella..... ready for her ball.....


May 25, 2011

Oh Father... how we Idolize you

I don't know about you, but I seem to remember a lot of Father now in my 40's... or maybe it's just the fact that I have kids and I remember a lot of the stuff my dad did with us as growing up... I sure miss him. 

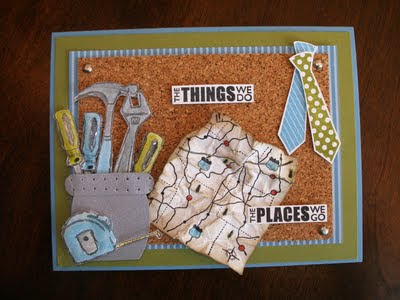
So, of course this year I had to use the new Summer Mini stamp set (Best Dad Ever) for Father's day!!!  I also used Travel Log for the Map and sayings as well as Totally Tool from the main Catalog pg 61... been wanting to use that forever!!  So, now I combined all three!!  And, here is what I came up with...

Mostly inspired by my kids who think that everything they break Daddy can fix... and they are very fortunate to have a Dad that is extremely adept in many areas of "Fix It" world.  He also enjoys the outdoors, and getting his hands dirty....  So, here's to you Dad... hope you like it.


 Close up of the tools.. I used crystal Effects on the Screw Driver Handles and the Tape Measure box... gave them a little extra pop.. you know.. like the real thing?  


All Products can be found here 24-7 for your shopping convenience or feel free to contact me for anything.
Recipe: 
Stamps: Totally Tool, Travel Log and Best Dad Ever (the last two are from Stampin'Up!s Summer Mini Catalog and are only available for purchase through August 31st.
Cardstock: Marina Mist, Old Olive, whisper white and Brushed silver
Ink: Basic Black, Basic Grey, Old Olive, Soft Suede and Marina mist.
Other: large Oval Punch, window word punch, paper piercing tool, silver brads, crystal effects, sponge, stampin write markers (same colors as inks plus poppy parade, pear pizzazz and daffodil delight on the map and tape measure).  Cork sheet for the tool wall and the Brights collection of Pattern  Designer Series Papers (stipes) in Marina Mist. Stampin Dimensionals (pop up thingies) to make the map and jar of tools pop off page, glue dots and Snail tape to assemble.

Hope you enjoy and get inspired!  Thanks for Looking... til next time.
Sandra.

May 17, 2011

Summer in Full Bloom


Today I had to come up with a Scrap Layout that I could use in a demo for a group of ladies.  So, what better opportunity to use my new stamp set from the Summer Mini... I used the card sample on page 20 as my guide and changed up the colors and punches I used.  This is a clouse up of the stamped images... I took sponge daubers to add the color to the images and then played with my Dazzling Diamonds to add some bling.  The butterfly is decorated with the rhinestones... I LOVE THE RHINESTONES!!! LOL.  I used the 2 3/8" scallop circle punch and used it on the concord grape flowers and added some dimension by lifting them off the page.  The mats are also Concord Grape with a little window box in the coordinating Designer Series Paper from from the 6x6 pack in the Level 1 hostess pack.  These are easy to earn and I love using them.


Here is the complete page... no words, but they can be added when you add your photos... Can't wait to do that.... Much brighter in person...


 A little close up of the pretty butterfly.... All this from one stamp set!!! Love it!!!
If you like this page and what you see here... you can order 24/7 here

These are the supplies you'll need:
(Items with * are from the summer mini or only available for a limited time)

Stamp Set: *Flower Fest
Cardstock: whisper White, *Concord Grape (mats), In textured: Daffodil Delight (scallop trim), *Pear Pizzazz
Designer Series Paper: Window boxes on Mats.... *In Color DSP 6x6 Pack ... level 1 hostess (can earn it
 with a qualifying order)
Inks: *Concord Grape, *Pear Pizzazz, Regal Rose, Daffodil Delight and *Peach parfait
Other: Dazzling Diamonds glitter, clear rhinestones, glue dots, dimensionals, 2 3/8" round scallop punch, butterfly punch, Scallop border punch and sponge daubers.

Have fun!!

May 11, 2011

Mother's Day Full of Cheer

I wanted to make something cheerful for my sisters and Mom... so, I came up with this.  Was feeling like Yellow and Green...clean, crisp, fun.  Hope you like it.

 A close up of the dimension.

Yes, it has bling.. not too much, but enough. :)
Sandra.

My recipe:
All Stampin'Up! products unless otherwise mentioned.
Card Stock: Daffodil Delight, Old Olive, In Color DSP, Whisper white
Stamp: Bold Blossom, Four Frames and Well Scripted
Ink: Classic Grey, Pear Pizzazz and Daffodil
Other: Label Punch, *New Blossom Bouquet Triple Layer Punch, Top note die, big shot, olive grosgrain ribbon, dazzling diamonds, crystal effects, dimensionals, glue dots, Brights button assortment and Sweet Buttons Embosslits
You can order any and all of these products 24/7 here


April 13, 2011

My Baby's Bunny surprise

Like many of you... I buy I buy and then it just sits...well, I'm making and EXTRA effort to use all my dies and pretty papers and stuff... Whew!!!  IT'S SOOOOOOO MUCH FUN!! To just use the stuff instead of hording the stuff... Well, so I have this die that makes these cute little bags... with a lid.. soooooo, naturally with Easter right around the corner and I had also bought these fun little eggs filled with bubbles on a necklace at your local craft store... and presto!! They are a perfect fit for each other... the egg fits just right in the bag with a little extra room up top and Mercedes from: mercedesweber... a fellow demonstrator from  Stampin'Up! came up with this bunny made up using Stampin'Up! Punches... Too cute!!!


I used her idea and made some variations... I love it!!!  puffy nose with googly eyes and he fits right smack on the topper part of my bag!!  I can't wait for the kids to see these.  Thanks Mercedes for your video... I changed the punch for the ears for the new Build a Blossom Punch.. using two of the coordinating petals.


Here is Mr. Easter bunny
Thanks for looking!!
Sandra.


From Behind... 
You can have a personalized stamp too!!! I love putting her name on the little treats.
Ask me how.

April 12, 2011

My little Sister's Birthday

Ok, so if there is a day you don't want to forget it's your sisters birthday right?  Well, my sister picked a special day to make her appearance in this world... Tax Day.. How can you ever forget when your taxes are due!!  LOL... anyway.. I really wanted to make her a special card and really wanted to use these stamp sets together... and Viola!!!  I lov it.. full of bling, oozing with crystal effects on the cakes and so fortth... can't forget those itty bitty teeny tiny self adhesive little pearls that are decorating the gift bag!!! How perfect are they!!!

Well, I invested an afternoon creating.. haven't been doing much of that lately or rather cards.. mostly scrapping.. or trying to with a friend stamper and crafter... HI Amelia!!!

So here it is.. hope you like it...and so does she!!

Sandra.


And a close up of the details...

January 29, 2011

Desktop Calendar

One of my favorite places to get ideas from is the wonderful world of Splitcoaststampers.  Created by a Stampin'Up! demonstrator who was looking to share ideas.  It turned into such a huge success that almost everyone I know knows about it and goes there pretty regularly for ideas and to share as well.

Anyhow, I have a favorite person I got to for calendar ideas and templates.  She is wonderfully generous and has shared her templates with us fans.

This is my version of a Desktop Calendar originally created by: Cami or Cambria Turnbow (one of my favorite crafty ladies) and using CAT's desktop calendar template for 2011.  I love how it came out and that it's the size of a regular greeting card 4.25x5.5.  I could fold it and mail it to a special friend if I wanted to, but this time it's mine.  I need it.  LOL.

Hope you like it as much as I do. Each section is a Season Quarter.. so I started with Winter.. Jan-Mar and tried to encompass colors and Designer papers and punched embellies that may represent the season and each months Holiday if any....

Winter
New Years-Valentine's Day -St. Patty's Day

 Side view


Spring
Easter-Mother's Day-Father's Day

 Side view 


 Summer
4th of July-Harvest-Labor Day


 Side view and more true to color... 


Fall
Halloween-Thanksgiving-Christmas-Hannukah or Kwanza

 Side view... Can you feel the changes in the air?  Love to play with the dies

 this shows the middle band holding the card upright.. tucks behind first layer on card.


Supplies used are all Stampin'Up! products unless otherwise stated:

Cardstock: Marina Mist, Real Red, Whisper White, Garden Green, Rose Red, Daffodil Delight, Rich Razzleberry
Designer Papers:  Play Date, Springtime Vintage, and from retired ones: Sweet Pea and a couple of Past Holiday ones.
Other: Punches: Scallop Circle, Window Word, Modern Label, Two step bird, large Heart,1 3/8", 1 1/4", 1" circle punches, New Snowflake die, Leaves #2 die, swirly die, sponges for color, rhinestones, button from Brights collection.
Dimensionals (pop up sticky dots), glue dots, snail tape.
Stamps: An old favorite: Everyday Flexible Phrases

Thanks for looking.
Sandra

January 13, 2011

A "Sucker" for Valentine's

With Valentine's quickly approaching.. I thought I'd take my time to make little treats for my baby's friends at school.  I bought some cherry flavored heart pops at CVS and wrapped them up.

What do you think?  I love them and they were so easy to make.


You can make these too!  All products are from Stampin'Up! and can be ordered from me 24/7 here.

I used:
Cardstock in: Real Red, Melon Mambo and Regal Rose.  Fronts are Whisper white.
Ink: Basic Black
Stamps: Sweetheart, Jolly ol St Nick, and Got Treats
Other: Heart punch, 1/4" grosgrain ribbons in Real Red, Pretty in Pink and Whisper White, crop a dile for hole on bottom for sucker to go through.
I mounted the white cardstock on the Melon Mambo and closed the box with one glue dot in the front...

Here are some pics for reference.

From one sheet of 8.5x11 cardstock you can make 4.. well, 5 if you don't mind a bit narrower one.

Measurements are 2.75x5.75, so if you cut first on the 8.5 side... cut a strip at 2.75 inches off, then you end up with a sheet of 5.75 x 11 and then cut 4 strips at 2.75" along the 11 inch side... you get 4 exactly.  If you cut the long strip to 5.5, now you have 5 sucker covers.
This pic shows the strip scored at 2.5, 5" and 5.5.  So, the back is the side with the 2 smaller flaps, the first small flap (1/2") is the bottom of the sucker where the stick goes through and the 1/4" flap at the end... that tucks neatly under the front part where you will glue dot them in the center.

Here is what it starts to look like when you fold it... see the flaps... it all tucks under...

This pic shows the front white cover stamped and adhered to the front.  Whisper white Cardstock was cut to 2.5x2.25 to fit the pink square perfectly center.  I stamped the Heart saying first, then punched out a scrap heart with my punch and adhered it to the center of the stamped heart saying... again, I took the heart punch aligned it over the heart (now stuck to the white) and punched it ... see next pic.
The back I stamped a saying from Got Treats stamp set  and the "From" from Jolly Ol St Nick and signed my baby's name.  Here you can see the hole I punched with the  Crop-a-dile to slide the sucker stick through.


Here you can see both layers punched through now... ready to assemble
 Push stick through... and add a glue dot to flap on bottom so you can bring the top front cover down and close the box. Easy for kids to open if you only have one glue dot.

Add a cute ribbon in a bow to the front... and viola!! Make a bunch.


Hope you found this easy to follow. 
Til next project. 
Sandra.