January 22, 2014

Free Tutorial! Happy New Year! Treat Yourself to...


This cute little Treat box or a type of it has been circulating around for awhile, and I've been meaning to make one... and I did for Christmas and then modified it quite a bit to make my own.. I really wanted a treat dispenser that would close at the opening .... so, I came up with this one finally that suited my needs and is easy to duplicate in any size really.

Hope you enjoy this as much as I have making these....

What you'll need to duplicate mine:

Pool Party Card Stock in 12x12
Coordinating color cardstock (used Real Red in this sample) and Crumb Cake for bows
Heart was made with Real Red in the Co'Ordinations cardstock
Silver glimmer paper for (Love)
Designer Series paper (Fresh Prints from the new Occasions Mini)

Paper Trimmer (I used my Stampin' Trimmer... it does it all, well almost)
Paper Snips (scissors)
Sticky Strip  to adhere
Glue dots
Dimensionals
liquid glue (used mono liquid glue) My fav!
New: Spiral Flower Originals Sizzix Die and the Bigz L Die "Gift Bow
Expressions Thinlits dies (Love), Hearts collection Framelits and
Apothecary framelits
Itty bitty punches (small flowers)
corner rounder punch
Rhinestones Basic Jewels
Seam binding ribbon in Pool Party
-----------------------------------------------------------------------------------------------------------------------
 
Starting with 7 x 12" cardstock
Score at 3-1/16, 5-3/4, 8-13/16, 11-1/2" parallel to the short edge

 Step 1.  Use the template as your guide and please, make a sample one with some scratch paper... just to get the hang of all the cuts and scores....
See score lines here:
  
Step 2:  Then turn to long side and score at 3” from 0 to 12…see next pic
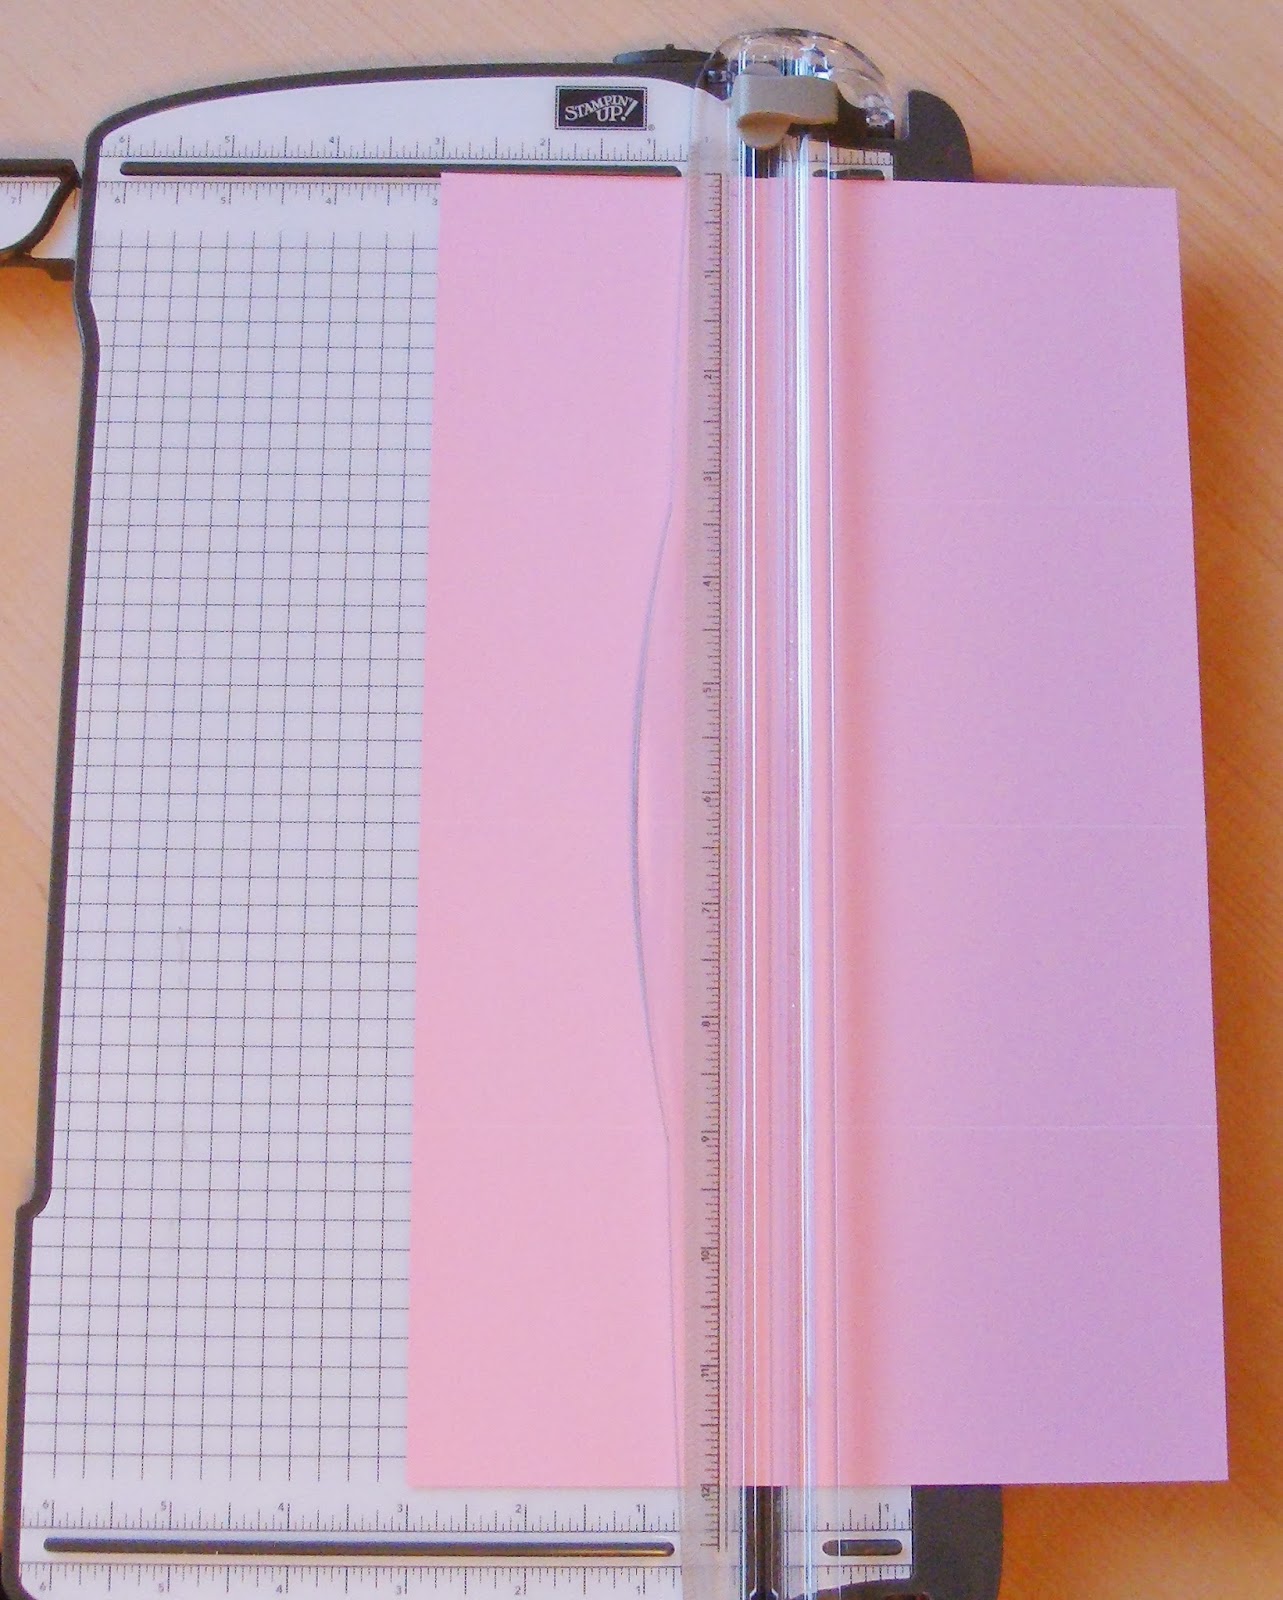
 
Step 3: Now… move over to the 4” mark and take cutting blade to cut from bottom… edge to first 3 1/16” score mark, stop – lift the blade and without moving the cardstock… move the blade to the second score mark and start to cut from that point to the end or top if looking at pic …  so the only area not cut is the 2nd square that’s labeled “Bottom” in the schematic – first pic.. or see pic below here:
 
*** You now have to be very careful… do not remove the flaps…  turn the cardstock as in the pic below and measure about 1.5” from the score mark on the second square (the only one not cut) so you are removing the long flap on the right… see pic on left... do the same from the first score mark 1.5” to the left and remove that section as well – pic on right here: 


 This is what your pic should look like now:


Candy box flap construction:

At this point you can create the flaps for the bottom of the box and the little flaps(and hinges)  that will tuck in the box to hold the lip from falling open. See pic here for what the cuts will look like:


Step by step to cut ...

  1. Cut the first 3 1/16” score mark to the 3” score mark and snip off at an angle into the first square and do the same from the 5 ¾” mark.. cut to the 3” score and snip a small angle to the right so it matches the pic below.
  2. Take the cardstock and move it to the 2 ¼” mark (see pic.. the blade is sitting on the cardstock at the 3rd score mark and the 2 ¼” mark), you are going to cut from this point to the top.  This will create the box opening…
 
  1. Now turn the cardstock so you can snip into the last 5 ¾” flap at an angle to the left.  See Pic below here: 
 
    4.  Almost done!  Whew!  Now we will concentrate on the hinges of the box flap (in pic above… the “T” above the cutting bar.

 
      5.  Pic A: snip about ¼” (see where scissors are inserted), make a small triangle by angling the scissors as shown.. cut slowly and only to about a 3/16” mark from the edge of the 1 1/2” tab.  (In the pic.. you see a cut mark already there… I did this prior and you can too.. I cut straight to about ¾” from inside score mark) and turn your scissors to cut a skinny strip to the end of the tab.  Do the same for the left hinge….See pic B…
 
 Pic A
 Pic B

  1. This is what we have now: Fold your score marks as shown and take a corner rounder and round off the edge of the flap where the hinges are attached to.. this will finish the flap nicely.
  1. At this point.. if you plan on adding additional cardstock and/or designer paper to the side of the box to decorate ... you will want to do that before you assemble the box.. much easier and I will go into that now. Otherwise, assemble box as in Step 9 below.

    1. Here are some measurements for cardstock squares to decorate your box:

    1. **If you are double layering (cardstock and then a designer paper on top)...  just make the top layer of paper 3/16" smaller than these cardstock measurements in order for your layering to be even. See pic here for sample of paper layered on the red cardstock... 

 
       c.     Decorate all sides of box as you wish… leave the front of the box with no embellishments except for the layered cardstock… you will want to add the embellishment later so it creates the box closure correctly…
 
So, now you have a box with the squares of cardstock and maybe some designer paper adhered to it.  You can now go to step 9.

  1. You will use a strong adhesive ( I used sticky Strip) for the two flaps on bottom of box and the ½” flap that will close the cube (box)… See pic for how you want to close here:   For a stronger finish, tuck the bottom flaps in and adhere to the bottom of box… when you finally assemble, you will adhere the box to a base in a later step.  Adhere your box… making sure it’s all straight.

  
  1. To create the base for the box:  Piece of chipboard and two cardstock squares in 3 x  3 3/8” measurements … adhere each cardstock piece to both front and back of chipboard.  You can ink the edges of the chipboard in the same color of the cardstock you are covering with…  with a sponge so you don’t see the chipboard edges.  You can also use a coordinating marker.  Adhere the box bottom to the base using sticky strip again.

11.  To create the box lid:

a)    Score 4-1/4 x 4-5/8" piece of coordinating cardstock at 3/4" on all sides. Cut and taper the corners, then adhere little flaps under the lid.

b)    Measurements for lid trim in coordinating cardstock and Designer Series Paper decorating the lid:

c)     Cardstock: 2 -  9/16” x 2 1/2” for front and back flaps and 2 at 9/16” x 2 7/8” for side flaps.

d)    DSP: 2 – 3/8” x 2 3/8” strips for front and back flaps and 2 at 3/8” x 11/16” for side flaps.

**Decorate the top of the box as you wish.

The front of the box should be decorated with some sort of embellishment (such as a punched shape or label) that can be adhered with dimensionals and it should be overlapping the flap a little bit so the flap stays shut.  See finished pic here:


More views.... I love it!


Until next time... hope my instructions aren't too jumbled.
 
Sandra


December 18, 2013

Joy to the World! My singing Angels - Free Tutorial

That's exactly what I start singing when I see my little angels... thank you for your patience while you waited for my tutorial... the video was too long, so here it is in pics.... Totally Free!  this and more is what you can expect to get from my tutorials that I charge for... for those of you who are skeptical... skewing my eyes... LOL.. but really... I don't think that a couple of bucks for all this work is too much to ask... my time is valuable to me and this is my business, so I hope you don't mind when I do charge...

Any how.. here it is.. hope you enjoy and are inspired to Sing Your Heart Out as I do...


Singing Angels


My Singing Angels:

Supplies used are all Stampin’Up! Unless stated

Punches: See first photo for reference…
  • Lg Oval #119855 $15.95
  • Word Window # 119857 $15.95
  • 1 inch circle #119868 $12.95
  •  ¾ inch circle #119873 $12.95
  •  Itty bitty trio (only the flower one..ignore the small circle showed below) #118309 $16.95
  • Small Oval #120908 $12.95

Other:
  • Circle Collection Framelits #130911 $26.95
  •       Scissors #103579 $9.95 (Paper Snips)
  •           Pencil (your choice)
  •          Glue dots #103683 $4.95(pack of 300)
  •          Snail adhesive or your choice
  •          Bone folder #102300 $6.95
  •          Embossing Stylus # 125624 $4.50
  •          Ruler (any of your choice)
  •          Stampin Paper Trimmer #126889 $29.95
  •          Big shot or die cutting machine #113439 $99.95
  •          Embossing folders (your pick… I used the petals-a-plenty 116824 $7.95
  •          Stampin’ Write Marker  basic Black #100082 $3.50 (for face)
  •          Post it note… small square is fine
  •       Grid Paper (any kind will do, but SU's rocks!) #130148 $10.95 (100 sheets of 11x17"

Cardstock:

  • Brushed Gold #102935 $7.95 ( 10 pack 8.5x11”) for body/arms and wings
  •          Vellum cardstock #101856 $6.50 (pack of 20 in 8.5x11”) for white robe
  •          Blushing Bride #131198 $6.95 (pack o 24 sheets) for face and hands
SHOP 24/7 HERE for all your crafting needs!

Photo of all punches and most supplies used
 
 Step1:         I used the scalloped die from the collection and the second smallest for the head.  You cut out one in Gold (pink in the pic because it shows better) and one in the vellum...
 

Step2:          Take the Gold circle and score in half (I like to use the area in between the scallop  as a guide... this will aide in the wings too....


Step3:            You can use the grid paper to line up your middle point vertically on the ruler... so the score mark is horizontal... make a small mark in the middle just above the score mark... this is where the face will go... just make a small mark with the pencil...


Step4: On your bigshot (or die cut machine)... set up the circle as shown... put the scallop circle at the score mark on the cutting platform, so the other half is bent down off the platform (you will not want to cut through this side at all)... let it hang off... put the little circle die... just a bit off the score mark so it is also hanging over the edge.. this will create the attached head and neck... see the mark in the circle?  That is the middle of the head and neck... use a post it to hold the die in place if using a magnetic plate.. the die tends to wander... :)  Run through your machine and see next pic...

Step 5:  The body is now on the right... see how the circle only gets partially cut?  That is the head... Cut the Vellum in half.. same as the body .. cut in between the scallops so the two pieces match..

Step 6:  Cut with paper snips or paper trimmer over the score line... the vellum in half (you'll only need one half) and the body only on each side of the head...  Don't throw away the top part of the body... these are the wings...

 
Step 7:   For the wings... fold the half circle in half again so the flat side meets and score along top of circle cut out in middle... see pic...  Then, with snips (scissors) cut the score mark.... now lay these two pieces on top of each other, so they are perfectly matched...

 
Step 8:  On the edge where you cut the score mark and with both pieces together... take the large oval punch and slide the wing through as shown... you'll want a little on the left side (where head got cut out) and about 1/2 of the first full scallop) to be punched out... this will create the wing top part that curves later.... punch!


This is what it'll look like.... 

 
Step 9:

Step 9:   So, the part you just punched out is the top of the wings... when you assemble this way.. the flat score part will be where you join the wings... create a nice smooth c shape for neck ... adhere ONLY AFTER YOU'VE CURVED YOUR WINGS... SEE pic A and B below this pic...  with glue dot or strong adhesive...

 
NOTE: You will want to use your bone folder to give the wings some curve...You'll want to curl (as you would a ribbon) over your finger and the bone folder in one direction from the straight edge of the wing... then flip the wing over and only do the same on the tip of the wing in the opposite direction on the first couple of scallops... see pic A... I hope this makes sense...
 See pic b here for final look on wings....
 
PIC A
PIC B Wings curved and attached...
 

See here for a visual of what you are doing...  The wings will be attached to the back of the angel later...

 
Step 10: Set wings aside and let's make the body... again.. you will take the body piece and carefully with the bone folder... give the skirt some curvature... See pic A below ...  you'll want to hold the body and start from the head towards the sides to curve the skirt section to the back... then the opposite for the other side... see here..BE VERY CAREFUL THAT YOU ARE APPLYING GENTLE PRESSURE when doing the curvature... the head sometimes wants to get pulled off... OH MY!  LOL!!  gentle pressure multiple times will work just fine and this will allow the skirt to easily fold back without creating any wrinkles in the front of the body and neck...

 
PIC A: giving curve to body...
 
 
Step 11.. getting there...  now you can fold both sides to back and attach with a glue dot or strong adhesive... on the bottom where the ends meet...

 
This is what your Angel looks like now.. So cute!! Standing straight!!

 
Another visual...


Step 12: If you are not creating the white robe skip to step 16 and continue... Otherwise... take your vellum half circle and bring straight edges together and give a little pinch to folded center...
 
 
Step 13:  At the pinch mark you just made in center... take the 3/4" circle punch (seen here upside down so you can see your mark) and slide it about 1/2 way up and punch out a half circle.. this will be neck on the robe...

 
Step 14: At this point you can choose to give your robe a texture... I used the Petals a Plenty embossing folder from Stampin'Up! to add the flowers to the robe... you don't need a deep impression because the vellum will rip when there is too much detail.. you can choose to leave it as is also... so, you'll want to give this some curvature as in step 10 with the bone folder.. just a little is good... and you will want to do this after embossing if you choose to emboss...

 
Step 15:  This is how I like my robe... above the gold so it looks like an apron if you will... so my neck line on the white will go all the way up to the head as shown here...

 
Glue from behind as shown here... with glue dot or adhesive...


Step 16: Arms assembly:  Taking the 5th circle die from the smallest... you will cut out two circles (one in vellum (if making robe) and one in Gold (here in pink for sample)..

 
Step 17: holding both circles together.. on top of eachother... slide In the 1" circle punch... you'll want the punch to be close to the edge.. see here.. if using the punch pictured.. it was easy.. I slid down and centered using the top edge of the punch as a guide... the circle is just beneath the corners of the punch and this worked out fine... otherwise.. make a small tic mark with your pencil at 1/4" from center bottom .. and align your circle punch so you can see your tic mark just at the bottom of your punch... Punch so it looks like PIC B...
 
PIC A
 
PIC B
 
Step 18: This is how you want the arms to rest... the narrow part of the circle above,  will rest on the neck. .. these are the shoulders... and the wide part will be the long sleeves... so, fold the circle in half so the halves are mostly equal... you will want to emboss the sleeves now if you are doing so....then, cut the flat score you just made for the sleeves... see pic B.. leave the shoulders attached...
 
PIC A:
Sleeves cut open on both vellum and Gold... shoulders still attached behind head
 
PIC B:
Sleeves cut out. and shaped for some curvature... shape up and out for sleeves... . Do the same for vellum sleeves...
 
Step 19: Creating praying hands... you will punch out  slit with word window punch and feed each end into the flower punch as shown here... punch out the little flower to make fingers... ... you will then cut this piece with hands on either end in half... you have two hands now..

 
Step 20: Glue hands under the sleeves so they are equal and then glue the hands together at the wrists so they are in a praying position...

 
Step 21: Slide the Arms over the head and secure arms to body from from under each sleeve with a glue dot... Note: you are looking a the finished Angel here as a reference only... almost done...
 
 
Step 21: Face assembly:  Using the small oval, punch out a face as shown... leaving the edge of the cardstock just a little bit inside the punched area... so it is flat to match the neck line...

 
Step22: With your marker... make your singing angel... and attaché to the head with adhesive of choice... NOTE: you can do this after step 10 before gluing the body... Also NOTE: The gold in the background circle serves as the Angel's Halo... I LOVE IT!!!

 
Step 23: Bring those wings out... and attach to the back of the body with Glue dots as shown in PIC B...  I stood my angel up on the table and glued the wings on so I could see how they were being attached .. it just made it easier... The curved tips of wings should be bent toward the front o the Angel as in PIC C... You are done!!!
 
PIC A:  Wings

PIC B:  Wings attached from behind... 
 
PIC C: Completed Angel... Halo and all!

 
NOTE: You can make several of these and join them together to form a Choir.  Have fun and show me what you come up with..  :)
 
Merry Christmas and I hope you all enjoyed my tutorial... leave me some comments below and let me know if you'd be interested in future Tutorials from me... I do enjoy doing these...
 
Stay tuned... I have more coming...
 
Sandra